CodeMorphis
Joined: 02 Dec 2003
Posts: 252
|
 Posted: Wed Jan 21, 2004 12:04 pm Post subject: Programming Tip #4: Creating Menus in a Windows Form Posted: Wed Jan 21, 2004 12:04 pm Post subject: Programming Tip #4: Creating Menus in a Windows Form |
 |
|
Programming Tip #4: Creating Menus in a Windows Form
In this programming article, we demonstrate how to create menus and menu items in the toolbar of a Windows Form. We will also look at how to put the control logic behind this type of user interface to respond to a user's mouse and keyboard entries.
- In Synopsis, press Ctrl-T to bring up the component tray and click on the "Windows" tab. Drag and drop the Windows Form component onto the workspace area.
Double click the new Windows Form that appears to bring up the Windows Form property page. If you scroll down to the bottom of the property page you will see a GroupBox titled "Menu Items".
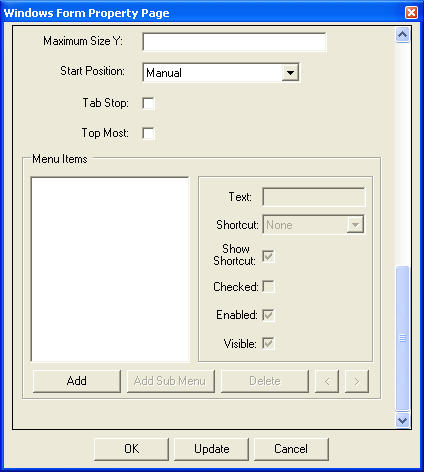
- Click on the "Add" button and you will see a new menu item appear in the menu items box. Click on the menu item in the box to fill the menu item property set on the right side:
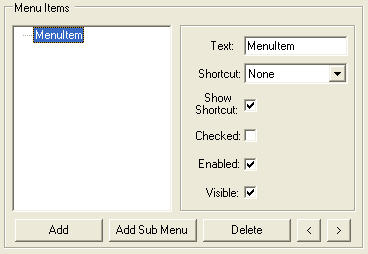
- You can change the text of the selected menu item as well as other characteristics of the menu item. Change the text to "File".
- Now let's add a sub menu item to the File menu item. Click on the "Add Sub Menu" button. Click on the new sub menu item that appears and change its text to "Open...".
- Select the "F1" shortcut for the "Open..." sub menu item. The shortcut is the key that is associated with the menu item. When the program is running and the user presses the shortcut key, the menu item gets activated.
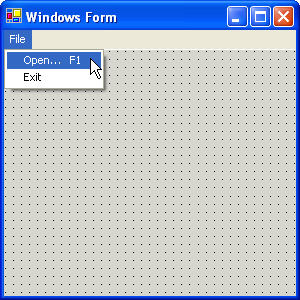
- Click on the "File" menu item and then click the "Add Sub Menu" button again. This will add another sub menu item below the "Open..." sub menu item. The order of the menu items in the box determines the order in which the menu items appear in the Windows Form.
- Change the text for the new sub menu item to "Exit". Click on the "Update" button at the bottom of the property page. This will refresh our Windows Form with the given property values. Our Windows Form now has a menu bar. If we click on the "File" item we will see the results of our labour:
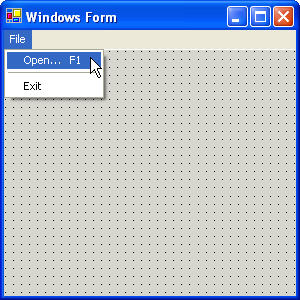
- Go back to the property page and select the "File" menu item again. Add another sub menu item. Change the text to "-" (the dash character). Select the "Exit" item and click on the ">" button. This will shift the position of the "Exit" item down so that we have the order: "Open...", "-", "Exit". A menu item entry with text "-" is windows code for specifying an item separator bar. Press the "Update" button again and look at the Windows Form menu bar:
Now that we have created our menubar interface, let's add some simple code behind it. We will make a simple program that opens up the file browser when the user clicks on the "File | Open..." item.
- From the component tray, drag and drop the "Windows Event" component from the "Windows" tab to the workspace area.
- Drag and drop the following components from the component tray onto the workspace:
- The "File Browser" component from the "File" tab.
- The "Switch" component from the "Logic" tab.
- Double click the Switch component and set the "Number of switch arguments" property to 2.
- Connect the components in the workspace as follows:
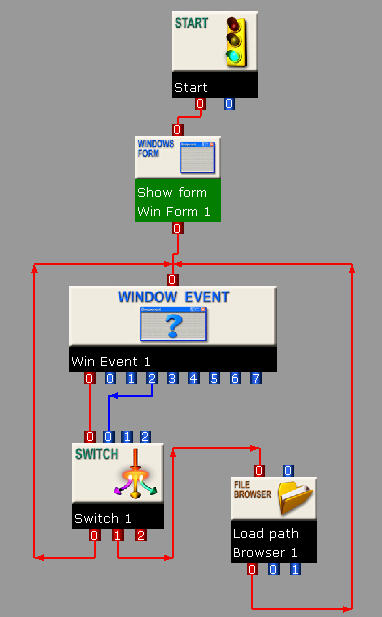
- Right click the Switch component and select "Input Argument(s)". Set the "Switch Argument 1" value to "Open..." and "Switch Argument 2" value to "Exit".
Now press the Run button in the Synopsis toolbar. If you click on the "File | Open..." menu item or press the F1 button the file browser appears, giving the typical behaviour in most Windows programs. If you click on the "File | Exit" menu item the program terminates. |
|
