CodeMorphis
Joined: 02 Dec 2003
Posts: 252
|
 Posted: Tue Feb 24, 2004 7:06 pm Post subject: Programming Tip #6: Using Splitters Posted: Tue Feb 24, 2004 7:06 pm Post subject: Programming Tip #6: Using Splitters |
 |
|
Programming Tip #6: Using Splitters
Splitter UI components are used to divide a Windows Form or a container UI component such as a Panel, GroupBox or TabPage. They allow the user of your program to change the amount of space allocated to segments of your interface. You see Splitters used in many Windows programs.
To see an example of Splitters in action, consider the Windows Form below:
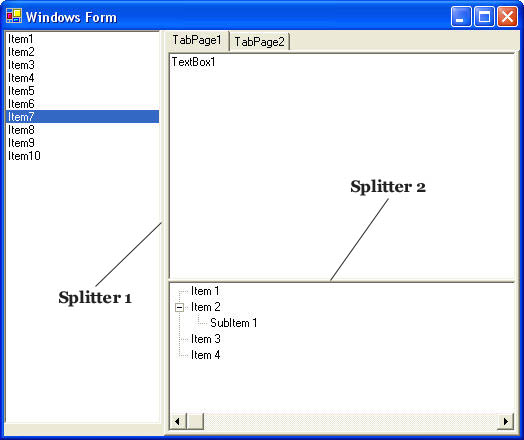
In this example, we see two Splitters being used. The first Splitter (Splitter 1) divides the Windows Form between the ListBox on the left and the TabControl on the right. The second Splitter (Splitter 2) divides the TabPage "TabPage 1" into two with the TextBox on the top and the TreeView on the bottom.
When using Splitters, the order of the UI components is important. A Splitter should be added in between the two UI components that it should separate. So, if you want to create a simple Windows Form with say, a TextBox and a ListBox, where each occupies a portion of the Windows Form and the two are separated with a Spliter, then you would arrange the order as follows: 1) TextBox, 2) Splitter, 3) ListBox.
Let's see how this is done by constructing the Windows Form shown above.
- Open the Component Tray in Synopsis and drag and drop a "Windows Form" component onto the workspace area.
- Select the "UI Components" tab in the Component Tray and drag and drop a ListBox component onto the Windows Form.
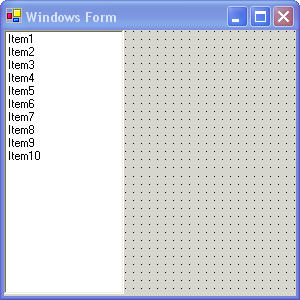
- Double click the ListBox and in the property dialog that appears, look for the "Dock" property and set it "Left". Double click in the "Items List" property field and add some items. The Windows Form should look like:
- From the "UI Components" tab of the Component Tray, drag and drop a Splitter component onto the Windows Form. By default the Splitter has the dock property set to Left.
- Drag and drop a TabControl component onto the Windows Form. Double click the TabControl and set its Dock property to "Fill". Be careful in selecting the TabControl component and not the TabPage component that is contained by the TabControl and added by default. To know that it is the TabControl component that is selected, look at the title of the property dialog. It should read: "TabControl Property Page". Now our Windows Form looks as follows:
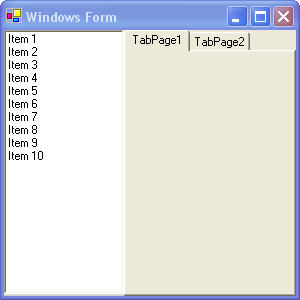
I have added a second TabPage to the TabControl by dragging and dropping a TabPage component from the Component Tray onto the TabControl.
- Drag and drop a TextBox onto the TabPage "TabPage 1". Double click the TextBox and set its Dock property to "Top". Also set it's Multiline property to true by clicking on the associated checkbox.
- Drag and drop a Splitter onto "TabPage 1". Right click on the Windows Form and select "Browse/Select UI Component". Select the second splitter by double clicking on "Splitter 2" in the list. In the property page that opens for "Splitter 2", set the Dock property to "Top" and set the Cursor property to "HSplit", which makes the cursor appear as a horizontal splitter icon when the user hovers the mouse over the Splitter.
- Drag and drop a TreeView component onto "TabPage 1". Double click the TreeView and set its Dock property to "Fill". You can add some items to the TreeView in the "Items" property section.
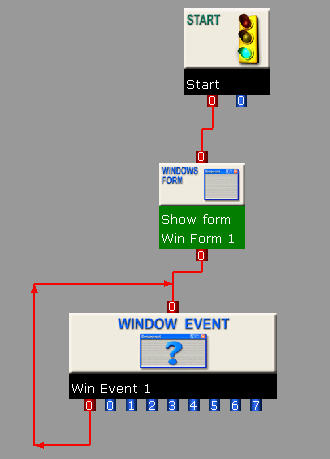
Complete the Synopsis program as below (consult previous programming tips for details on creating Synopsis programs). You can also get the Synopsis source file for this program at http://www.codemorphis.com/articles/tip6/Splitter.vpd
As mentionned above, the order of the UI components is important in determining which components are "split" by the Splitter. To change the order of components you can right click on a component and then use the "Bring to front" and "Send to back" options to reorder the components.
Another important point is that Splitters can be added to the component lists of a Windows Form, a TabPage, a Panel or a GroupBox. Each one of these UI components is called a container component because each one can contain other UI components. By dragging and dropping a Splitter onto a container component, you specify that the Splitter is to separate only those components in the given container component.
http://www.codemorphis.com |
|
