 |
codemorphis.com
Software development: pure and simple.
|
| View previous topic :: View next topic |
| Author |
Message |
CodeMorphis
Joined: 02 Dec 2003
Posts: 252
|
 Posted: Sun May 22, 2005 8:05 am Post subject: Posted: Sun May 22, 2005 8:05 am Post subject: |
 |
|
Let’s take a look at how to do what you want with the Array component and the user interface components.
Here’s a sample program that achieves your described requirements:
http://www.codemorphis.com/articles/ans_052205/arrayui.vpd
If you run the program, then the user interface looks like this:

The program allows you to add data to an Array component in two ways: either adding to the end of the array or replacing data in the array. You specify text in the text field next to the label “Text:”. When you press the “Accept” button, the text and the array index in the NumericUpDown UI component are retrieved. If the array index specifies an index that exceeds the limit of the current list then the text item is added to the end of the array. Otherwise, the text item replaces the appropriate item in the array. Each time you press the “Accept” button, the contents of the array is refreshed in the ListBox UI component.
Here’s the basic high-level logic flow of the program:

The basic idea here is that we first display the Windows Form for the user with the “Show form” service call. We then go into a Windows Event loop, waiting for the user to click the “Accept” button. We use the Switch component to filter out the events so that we only react when the “Accept” button is pressed. This is done by checking the value of output data port 2 of the Windows Event component. If that value equals the name of the “Accept” button, which we have appropriately named “Accept”, then we move through output process port 1 of the Switch component. There are two basic tasks that are then executed. First, we add the new item to the Array with the Nesting component “Add item”. Then we refresh the ListBox with the call to “Refresh list”.
Let’s take a closer look at the logic inside the “Add item” Nesting component. Double clicking the component reveals the nested logic:

The first things done are the retrieval of the text and the current value of the NumericUpDown component, which indicates the desired index value in the Array. We also retrieve the current number of items in the Array. If the index references an existing item in the Array we want to replace that item with the new text value. An array index is a 0 offset, i.e. the first item in the array has index 0, the second has index 1, etc. So the range of valid indices starts at 0 and goes till the number of items in the array less one. So if the index specified is greater or equal to the number of items in the array then the index does not reference an existing item. If the index is less than the number of items then it does reference an existing item.
We test the specified index against the number of items in the Greater Than Or Equal component. If the index is greater than or equal to the number of items, then process control moves through the component’s output process port 1. This causes the text value to be added to the array with the call to the service “Add item(s) ”. If the index is valid then control goes through output process port 0. This leads us to the call to the service “Set item”, which takes as arguments the index and the text value.
Both control paths then lead to the “Set Text” component which simply clears the text field UI component. The subsequent UI Component Interface component then reassigns focus to the text field so that we can wait for new user input.
Now, let’s look at the “Refresh list” Nesting component:
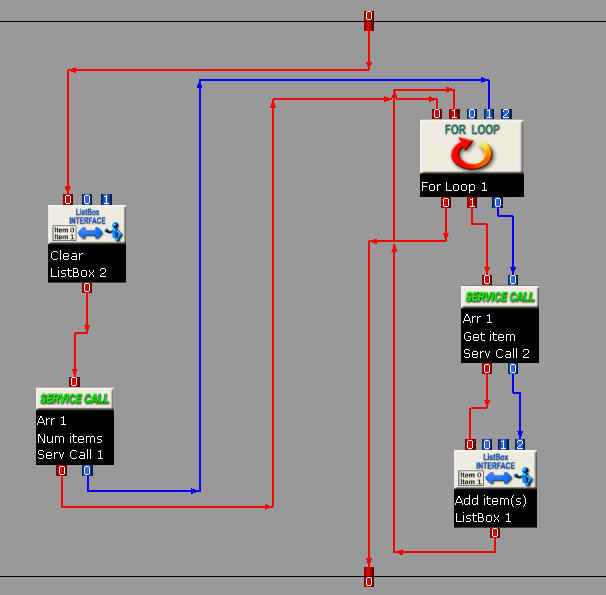
The idea here is to simply clear the ListBox component in the form and then fill it with the current contents of the Array component. So we first call the “Clear” service of the ListBox Interface component. Then we retrieve the number of items with the “Num items” service call of the Array component. We then enter a For Loop which iterates through the items of the array and adds each item to the ListBox with a call to the “Add item(s) ” service of the ListBox Interface component. The For Loop component has its input data port 0 set to a value of 0, meaning the first valid index of the array. The number of items in the array is passed into the For Loop’s input data port 1. We have set the For Loop’s “Exclude end index from for loop” property to true so that the For Loop will stop just before this value. To set this property double click the For Loop component and adjust the value of the property. Now the loop will go from 0 to the number of items less one. Inside the For Loop, we use the current loop index coming from output data port 0 as the index to retrieve from the Array. This returns the appropriately indexed array item which we add to the ListBox.
Hope that this helps to understand how to combine the various components and services to achieve your programming goals. |
|
| Back to top |
|
 |
CodeMorphis
Joined: 02 Dec 2003
Posts: 252
|
| Posted: Mon May 23, 2005 9:12 am Post subject: |
|
|
| You are welcome. Programming concepts from Basic or Pascal, for example, are helpful and can apply, however, keep in mind that Synopsis is not a programming language but rather a prototyping and development tool that acts as kind of a "glue" to fit together different technologies seamlessly. The aim is to allow you to get away from having to know about the various low-level details involved that can change over time. With Synopsis, you are concentrating on the high-level logic flow. |
|
| Back to top |
|
|
|
|
You cannot post new topics in this forum
You cannot reply to topics in this forum
You cannot edit your posts in this forum
You cannot delete your posts in this forum
You cannot vote in polls in this forum
|
Powered by phpBB © 2001, 2005 phpBB Group
|
