CodeMorphis
Joined: 02 Dec 2003
Posts: 252
|
 Posted: Wed Jul 20, 2005 7:02 pm Post subject: Programming Tip #17: Implementing drag & drop with Synopsis Posted: Wed Jul 20, 2005 7:02 pm Post subject: Programming Tip #17: Implementing drag & drop with Synopsis |
 |
|
Programming Tip #17: Implementing drag & drop with Synopsis
In Synopsis 1.1.9, the mechanism for drag and drop has been revamped. So in this article, we'll take a close look at how to use Synopsis to very rapidly implement this important programming technique. Note that this article supplements information provided in the Synopsis Help module for the UI Interface Component, which implements the services required by the drag and drop mechanism.
Let's examine the following program:
You can obtain this program here: http://www.codemorphis.com/articles/tip17/dragdrop.vpd.
If you run this program then two windows appear:
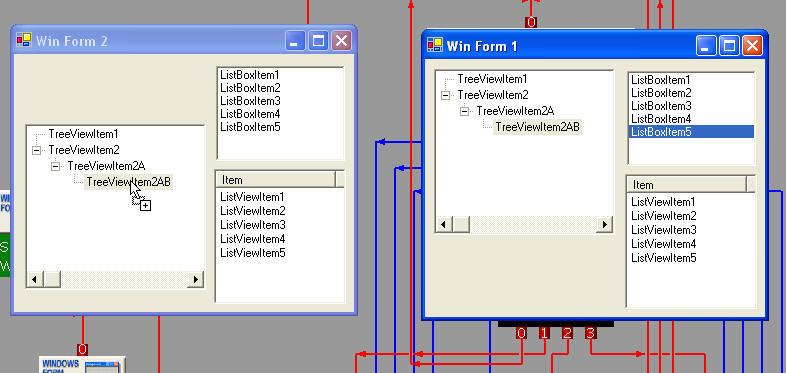
You will note that the program will allow you to drag items from the first form "Win Form 1" (on the right) to UI components in the second form "Win Form 2" (on the left). You can also drag and drop items from "Win Form 2" to the UI components on the same form. Finally, the program allows for file names or text data from external applications (such as Microsoft Explorer or Microsoft Word) to be dropped to and from "Win Form 2". Each time a drag and drop operation is completed (or aborted), the program issues messages to indicate what drag and drop event occurred. The program allows both copy and move operations. Simply dragging and dropping items indicates a move operation. Pressing the Ctrl key while dragging implies the copy operation.
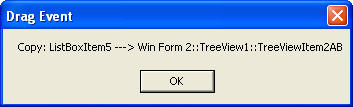
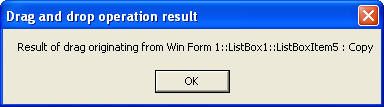
Given the drag and drop operation illustrated in the figure above, where we copy-dragged the item ListBoxItem5 from the ListBox in "Win Form 1" to the item TreeViewItem2AB in the TreeView of "Win Form 2", we receive the following two notifications:
Try dragging items to and from each windows form as well as to and from external applications to observe the behaviour of the program.
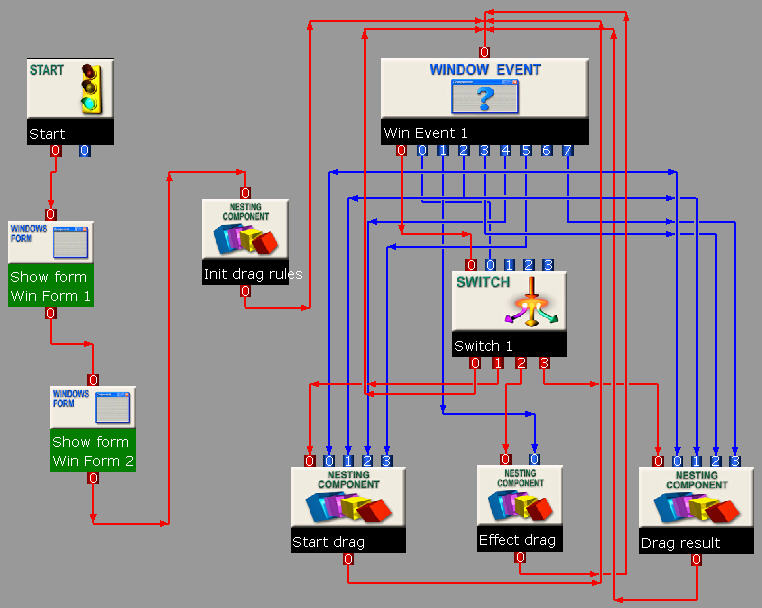
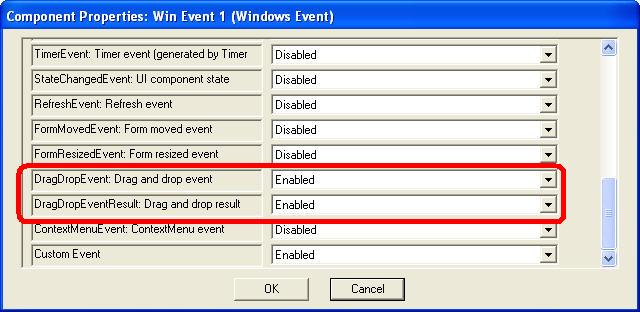
Looking at the overall program layout as described by the first figure, we can see that the basic logic flow is as follows. First, there are some initializations for drag and drop rules which dictate the behaviours of the program (the "Init drag rules" Nesting component). Then we enter into the typical Windows Event loop and wait for user actions involving drag and drop. When the user clicks the left mouse button, we initiate a drag and drop operation (with logic contained by the "Start drag" Nesting component). There are two drag and drop events: the DragDropEvent event and the DragDropEventResult event. These events provide information when a drag operation is completed/aborted (more on these events below). Finally, we have two Nesting components ("Effect drag" and "Drag result") that contain the logic to react to each of these two events.
Let's now delve further to examine the details of each of these aspects of our program.
The drag and drop mechanism requires that we set up drag and drop rules. These rules dictate what kinds of drag operations are to be allowed. We can specify: (i) which UI components on a form are allowed to receive drag data, (ii) what kind of drag data is allowed (e.g. file names or textual data) and (iii) which types of operations are allowed (e.g., Copy, Link, Move, None). File names are typical data coming from applications such as Microsoft Explorer. The drag operations like Copy or Move are distinguished by the icon that appears near the mouse during a drag operation and serve to indicate what the recipient of the drag data should do in response to receiving the drag and drop message.
In our initialization Nesting component "Init drag rules", you can see that we have specified six drag and drop rules:
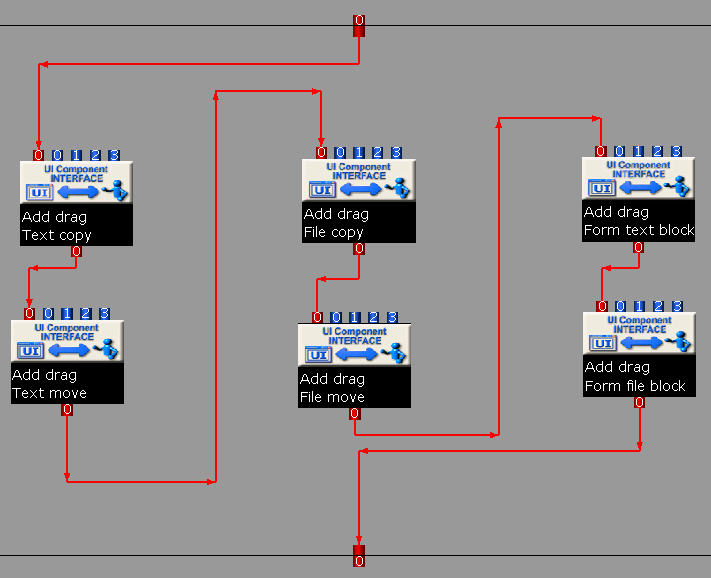
The first two rules in the process order define copy and move rules for text data. If we look at the arguments for the first rule (the component called "Text copy") we see:
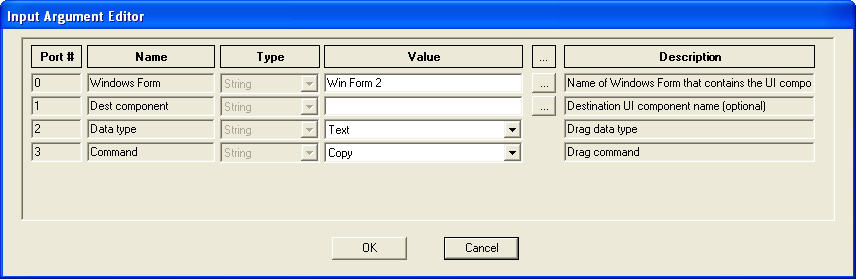
The target form name is specified as "Win Form 2" which identifies the form for which we are defining the rule. Note that the "Dest component" argument is empty, meaning that this rule applies to all UI components in "Win Form 2". The data type is "Text" and we are defining the rule for copying. This rule says: allow copy-dragging of textual data onto any UI component in "Win Form 2".
The rule defined by "Text move" is similar but has the sole difference of specifying the "Move" command. With the first two rules, we have therefore indicated that we want copy and move drag operations to affect all UI components in "Win Form 2".
The next two rules, defined by components "File copy" and "File move", are analogous to the first two rules, except they indicate that the data type is "File", meaning file names.
The last two rules approach the rule definition mechanism from the other side in that they allow us to block certain types of drag operations. Here are the arguments of the "Form text block" component:
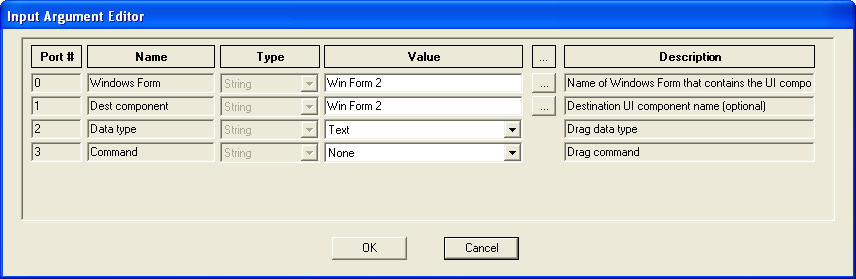
Note that the command type is None. This means that the rule disallows a drag operation. Since we have supplied the name of the form "Win Form 2" as the destination UI component, the rule says: disallow any textual drag operation onto the form itself.
The "Form file block" component is similar except that the specified data type is "Text".
The end result of the six drag and drop rules is: allow copy or move drag operations involving textual or file name data onto any UI components in "Win Form 2" except for the form itself.
The order in which you specify drag rules is not important. Rules are matched on a best-fit basis with blocking rules taking precedence.
Note that we have not specified any rules for "Win Form 1". This means that by default, no data can be dragged onto "Win Form 1". Indeed, if you try dragging onto this form then you will see the None drag icon appear, indicating that the target is refusing the dragged data.
Once we have defined our rule set, we are ready to process Windows Events to initiate and trap drag and drop events. The events that we are trapping are set in our Switch component's input data port:
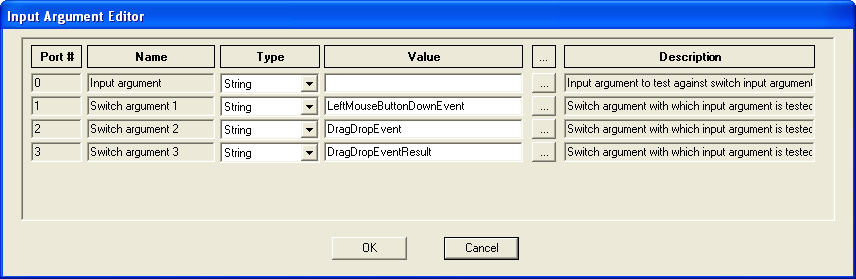
The first event that we test for is the left mouse down event. What we want to do is start a drag operation once the user holds down the left mouse button and tries to drag a UI component. We can see by the process control connections that this test leads to the "Start drag" Nesting component (refer to the first figure). Let's look inside this component:
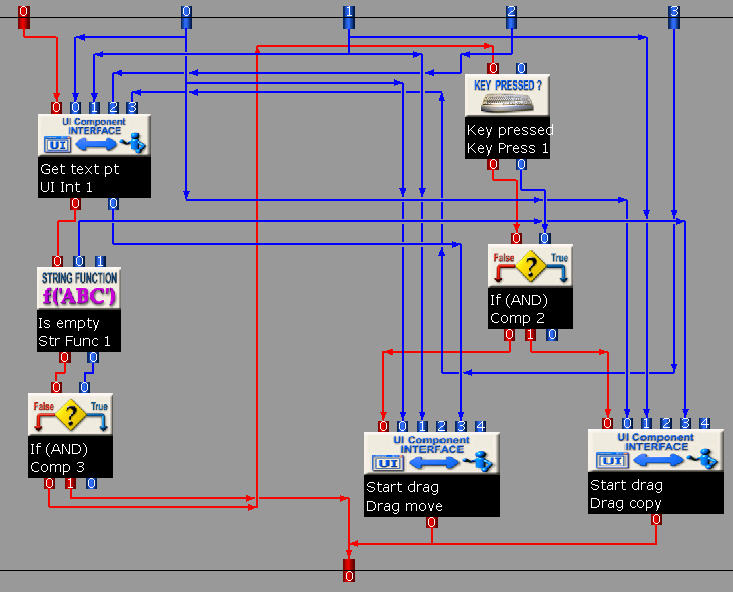
The incoming arguments to the Nesting component come from the Windows Event component and are:
- Input Data Port 0: Form name
- Input Data Port 1: UI component source
- Input Data Port 2: Mouse X position
- Input Data Port 3: Mouse Y position
The first thing that we do is use this incoming data to check what selection item is being referenced by the mouse cursor, given that the user has just clicked on the left mouse button. We do this to know what the user is trying to drag. This is achieved with the "Get text pt" service of the UI Interface component. Following this, we perform a simple test via the Key Pressed component to know if the user is pressing the Ctrl key while attempting a drag. If the result is false, then we move to the "Drag move" component, otherwise we move to the "Drag copy" component. These two components call the "Start drag" service of the UI Interface component to initiate a drag and drop operation using whatever data is currently being selected by the mouse cursor.
The "Start drag" service waits for the user to move the mouse while holding down the left mouse button. As soon as this condition is satisfied, a Windows drag and drop operation will begin and the mouse cursor will provide the appropriate drag receive feedback, depending on what is under the mouse cursor.
The drag and drop operation is completed (or aborted) when the user releases the left mouse button. If the intended receiver of the drag data (i.e. whatever is under the mouse cursor when the user releases the left mouse button) accepts the data then a DragDropEvent event is generated followed by a DragDropEventResult event. If the intended receiver rejects the drag data then only a DragDropEventResult event is issued.
In our Switch component following the Windows Event component, we have set these two events to be trapped:
The component that responds to the DragDropEvent event is the Nesting component "Effect drag":
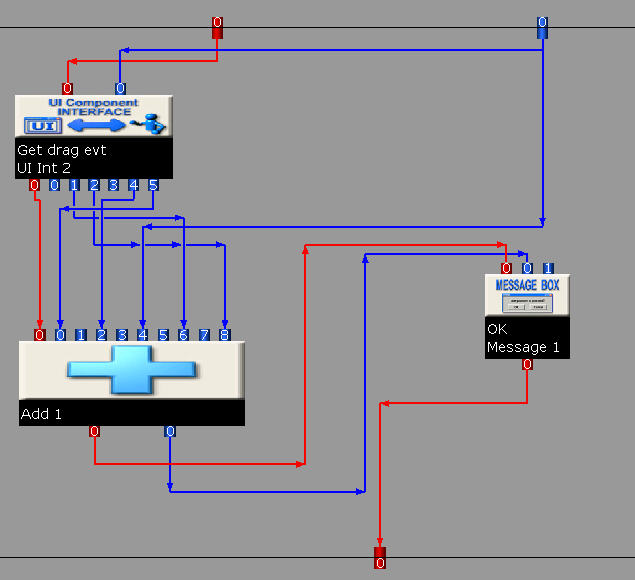
Here we make a call to the "Get drag evt" service to get extended information of the drag and drop event that occurred. We could have simply used the information provided by the other output data ports of the Windows Event (see the Help documentation for this UI Interface component service for an explanation of the event data accompanying the DragDropEvent event) but the "Get drag evt" service provides complete drag source to drag receiver information. In our simple program we only format this information to produce a message box to indicate what the user was trying to do. But this is where your program would react appropriately to the drag request.
The component that responds to the DragDropResultEvent event is the Nesting component "Drag result":
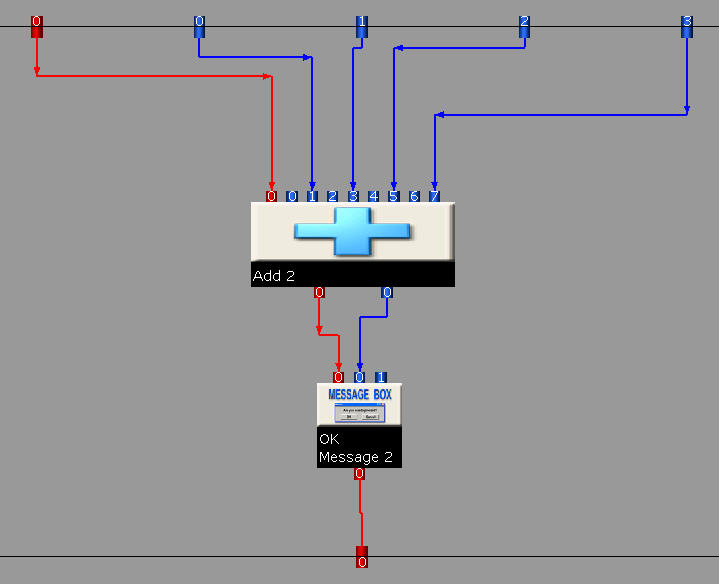
Here we simply format the information coming from the Windows Event component that tells us the result of the initiated drag operation. The information that we can process here is the source of the operation as well as the outcome (Copy, Link or Move). If the operation was aborted then the result is None (refer to the Help documentation for the UI Interface component for an explanation of the event data accompanying the DragDropResultEvent event).
The key difference between the DragDropEvent and DragDropResultEvent events is that the former tells us information about the receiver of the drag data while the latter tells us information about the sender. The DragDropEvent event is also generated only on the successful completion of a drag operation. The DragDropResultEvent event allows us to know the result of the initiated operation. A further need for the DragDropResultEvent event arises from the case where we drag data from a Synopsis form onto an external application. When this happens, no DragDropEvent event will be generated because the receiver is external to our program. The DragDropResultEvent event therefore allows us to take appropriate action(s) in response to a drag operation to an external program. For example, if a Move operation to another program was successful, we may want to now delete an item from the source of the drag operation. When both the source and destination of the drag and drop operation are contained within the same Synopsis program then both events are generated and you may trap either one or both, depending on the needs of your program. |
|
